Tush Guitar Lesson: Tips and Tricks for Perfecting Your Blues Rock Guitar Style
Ready to learn the 67th greatest hard rock song of all time according to Rolling Stone Magazine?
If so this Tush guitar lesson is the perfect resource for you!
Who wrote Tush?
"Tush" was written by American blues rock band ZZ Top and was the single released off their fourth studio album Fandango! in 1975.
Apparently, the entire song was written in just a few minutes during a sound check in Florence, Alabama.
It’s amazing how sometimes the best songs come the fastest. Another great example of this is Freddie Mercury when he talked about how he wrote “Crazy Little Thing Called Love” in just a few minutes as well.
Sometimes inspiration strikes and it’s almost like the songs just fall right out of the instrument. It’s truly amazing!
Tush Chords
Tush is a great example of how classic blues progressions made their way into rock songs. This one follows a standard 12-bar blues progression in the key of G and uses the I, IV, and V chords.
I chord = G
IV chord = C
V chord = D
These are the 3 most common chords in the key of G and a simple way of playing these chords can be done like this:
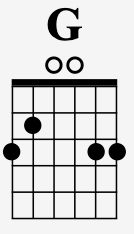
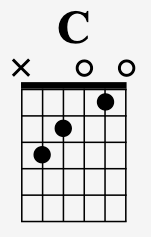
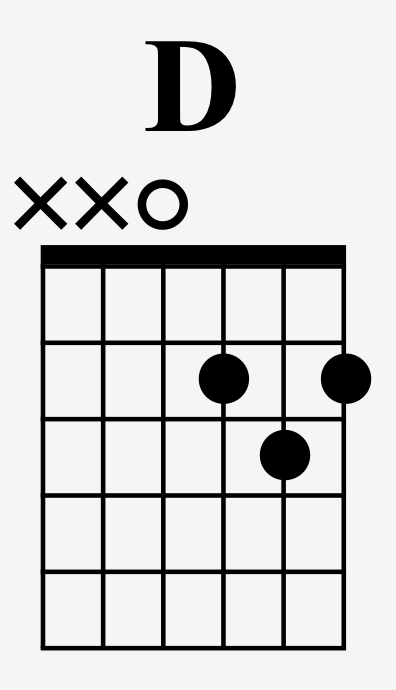
Next, you’ll want to drop these chords into the progression of the song which would go like this:
G (4 bars)
C (2 bars)
G (2 bars)
D (1 bar)
C (1 bar)
G (2 bars)
Start by following this progression and just strumming whole notes, tapping your foot, and counting out loud: 1, 2, 3, 4.
Tip: When you’re ready you can even try this along with the recording. Even though the actual guitar part is much fancier (which we’ll get to more below) you can still play easy chords and jam along with the song.
Riffs and Rhythm Patterns
As mentioned above the actual guitar part is based on just those 3 simple chords G, C, and D, but mixes it up with things like a signature riff, blues rhythm patterns, and walking bass lines.
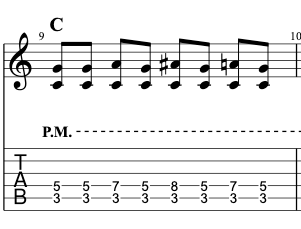
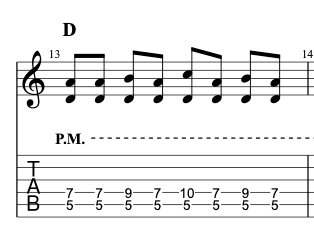
Once the chords are feeling comfortable next try to turn each chord into a blues rock rhythm pattern. This is a classic rock and roll rhythm pattern that can be used in countless songs.
This move is done by playing 2 notes at a time, starting with a power chord shape, and then reaching up with the pinky and grabbing the 6th and 7th degree of the scale in a pattern like this:
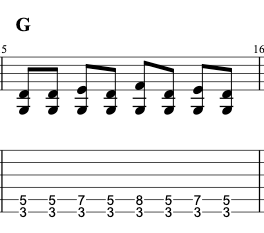
This pattern can get a bit stretchy for the fretting hand. If you are having trouble move the pattern up the neck and then slowly over time bring it down to the lower frets. Another easier variation on this can be seen in Chuck Berry's guitar style in his song “No Particular Place To Go” here.
You’ll want to apply this rhythm to each chord in the blues. So next would be the IV chord C.
And finally, the V chord D.
The Groove and Signature Riff
Now that you’ve got down the progressions and rhythm patterns next let’s experiment with some different riff variations and extra embellishments we can throw in.
First up instead of playing the G rhythm pattern from above let’s try substituting in a riff like this:
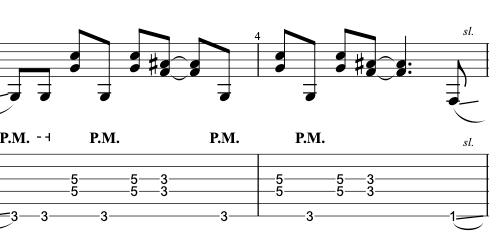
Here I’m bouncing back and forth from a root note on the low 6th string to a common rock guitar double-stop pattern on the 3rd and 4th strings.
During a riff like this, I’ll often copy the way that Billy Gibbons would play the notes on the 6th string and use my fretting hand thumb for those.
This isn’t 100 percent necessary you could also use the index finger if that is more comfortable for you. Also, I’ll often palm-mute those bass notes so the higher double-stops really cut through and don’t get overwhelmed by the bass notes.
Example 2 is another riff in this style and this one is slightly shorter. Again, this can be used in place of the G blues rhythm pattern in the 12-bar blues progression.
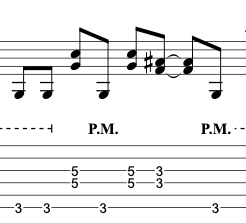
Another really fun move you can add is walking bass lines between the chord changes. So for example, as you go from the IV chord C, back to the I chord G in measures 6 to 7 of the 12-bar blues you could play this:
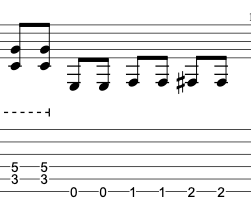
Here you start out on just the first 2 strums of the blues rhythm pattern, then play the open 6th string and walk up every fret to the note G on the 3rd fret of the 6th string. For the bass line, each note is played twice with an eighth-note rhythm.
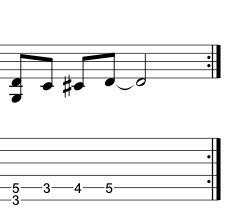
You can also add another walking bass line in the last measure walking up from the note C up to D like this:
Soloing
Gibbons often played slide guitar for this part of the song and he really tears it up during the solo section!
The band still plays the 12-bar blues as the backing while Gibbons takes an epic soloing drawing from deep blues influence.
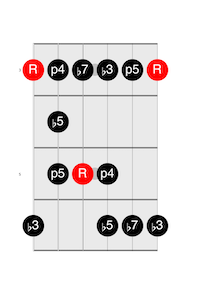
The master scale to know for starting to improvise over this progression would be the G minor blues scale which can be played at the 3rd fret like this:
How to Sound Like ZZ Top: Amp Settings Guide
Once you are feeling comfortable playing the chords and basic parts next try to dial in a guitar tone from the gear you already have. Here are some pointers for helping you achieve similar ZZ Top-style guitar sounds.
You want the guitar part to have a nice crunchy sound to it and this can typically be achieved with either:
- Using a cleaner amp and setting the gain high to get it to break up
- Putting a pedal in front of the amp for distortion
- Using a distorted gain channel and pulling it back to a moderate crunch
The easiest way I think is to just put a pedal in front of your amp. Then you’ve got to set your EQ and amp settings. Here is a guide to start with that:
Gain: 5-6
Bass: 5-6
Mids: 7-8
Treble: 5-6
Keep in mind that every rig is going to be different, so you'll want to listen to the song and compare your tones. In addition to distortion and EQ, you'll also want a bit of reverb to give your guitar sound a sense of space. Remember that this guitar part was written during a soundcheck in a rodeo arena with a dirt floor. Don't be afraid to try new things and see what works best for your style of playing.
Conclusion:
In conclusion, learning how to play "Tush" by ZZ Top on guitar is an enjoyable experience that can enhance your blues rock guitar skills. By breaking down the chords, riffs, and solos, you can gain a deeper understanding of the song's structure and develop new techniques as a guitarist. Whether you're playing for fun or performing on stage, "Tush" is a classic song that is sure to impress any audience. So grab your guitar, practice hard, and explore more great rock guitar tunes like “Call Me The Breeze” next!
Like this blog post? Get Jon’s best guitar lessons straight to your inbox.
